STEP 1 - VALIDATE THAT CETEC ERP TEAM HAVE COMPLETED SETUP
Navigate to Admin » Maintenance » Quickbooks Settings
[YOUR CETEC URL]/admin/quickbooks_settings
The page should look something like this:
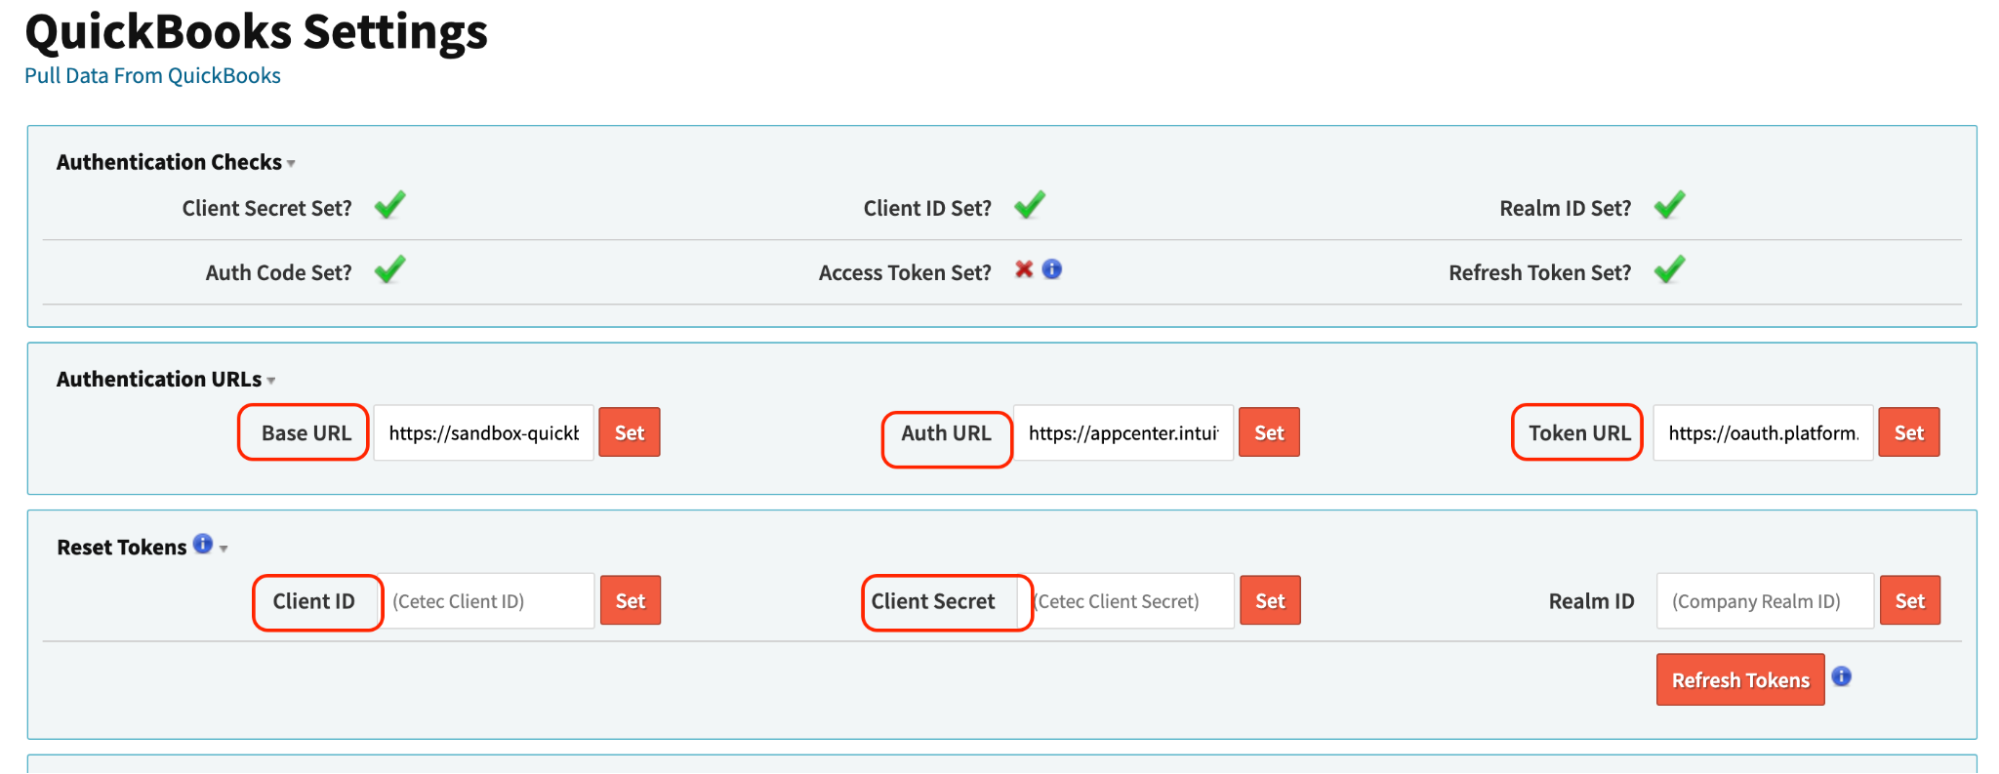
The following fields and check marks will be set for you by the Cetec ERP team. They are all validation points that your Cetec account has been authenticated with QBO and is able and ready to connect to QBO. Check that the following five items are set:
- Client Secret
- Client ID
- Base URL
- Auth URL
- Token URL
If you’d like, you can simply click the ‘Authentication URL’ title, and it will hide that entire section.

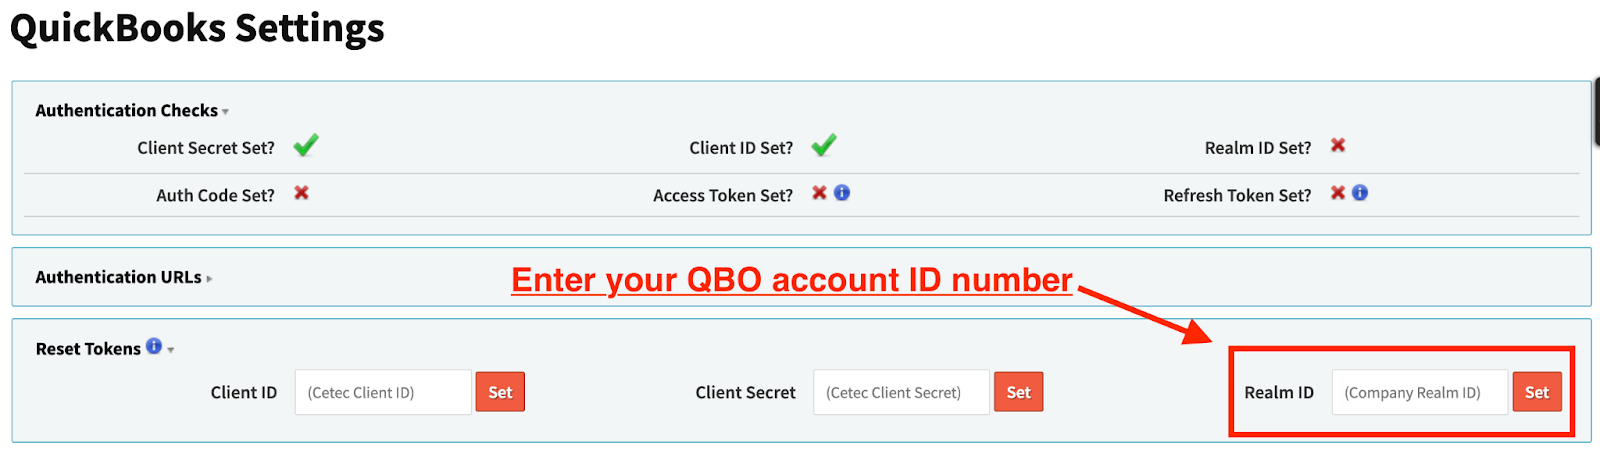
Your first task is to enter the ‘Realm ID’. The Realm ID is the Company ID found in your QBO account.
If the you need help finding the Realm ID, there are some instructions provided by QuickBooks here.
Park that realm ID where the red arrow points to below:
STEP 3 - CONNECT/AUTHENTICATE YOUR QBO INSTANCE TO YOUR CETEC ERP INSTANCE
NOTE: this step requires a QBO admin user to be the one clicking the “Refresh Tokens” button in the browser window OR it will NOT work.
Scroll down to the bottom right-hand corner of the Admin » Quickbooks Settings and click ‘Refresh Tokens’.

At this point, you should be automatically redirected to a webpage that authorizes your connection to your Cetec ERP Account and QBO Account.
STEP 4 - GET DATA INTO CETEC ERP THAT ALIGNS WITH DATA IN QBO
First, you need to make your best effort at getting all [customers, vendors, PRCs, Prcparts, accounts, and terms] loaded into Cetec ERP and all [customers, vendors, items, accounts, and terms] loaded into Quickbooks.
Obviously it is best if the data sets align as closely as possible. Also obviously, if you are a brand new user of Cetec ERP, the data import process of [customers, vendors, PRCs, Prcparts, accounts, and terms] into the Cetec environment comes FIRST, before integrating with QBO!
Ask our team (support@cetecerp.com) for assistance or check out the import documentation in the app (Admin>APIs>Data Import Documentation).
If possible, make aure the names of your vendors, customers, Prcparts (items), and account match between QBO and Cetec ERP. You may consider exporting the data from Quickbooks first and then importing into Cetec ERP.
The overall point is that your data import comes first; once the [customer, vendor, Prcpart, accounts, and terms] data exist in both Cetec ERP and QBO, then they can attempt to be synced and tied together.
STEP 5 - SYNC DATA BETWEEN CETEC ERP & QBO
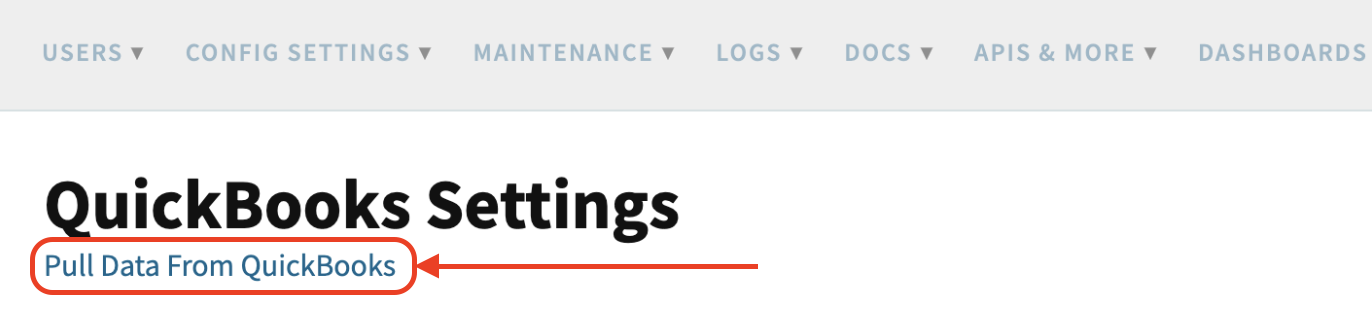
At the very top of your QuickBooks Settings page, click the link that says ‘Pull Data From QuickBooks.
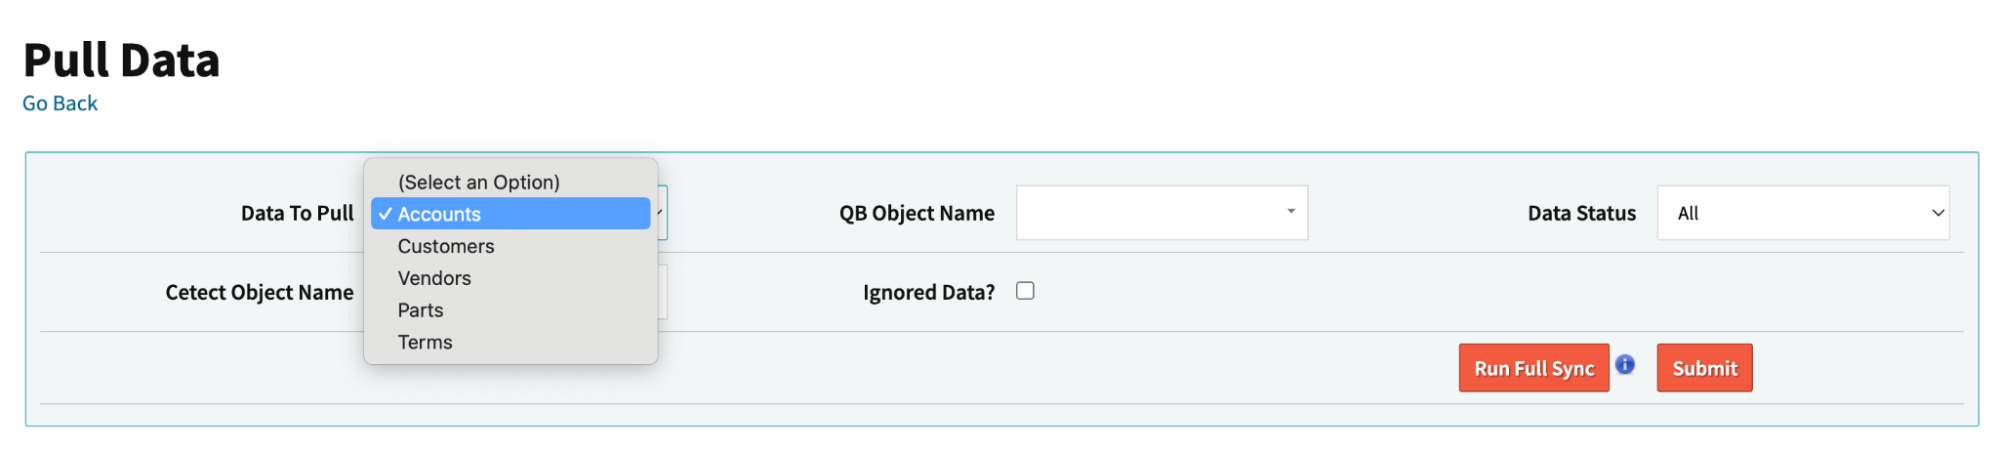
This will take you to the screen where data may be tied/synced between Cetec ERP and QBO. The screen is titled “Pull Data” and should look like this:
The process for tying data sets together between Cetec ERP and QBO is two-step (take customers for example):
- You pull the data set (of customers in QBO) down from your QBO system into the Cetec ERP QBO “Pull Data” interface;
- You sync specific Cetec data records (i.e. customers already inside Cetec ERP) to their corresponding data records in QBO.
Let’s review these two steps in greater detail:
1. Pull Data Down From QBO
First, select the type of data that you want to sync (e.g. customers, vendors, parts, accounts, or terms).
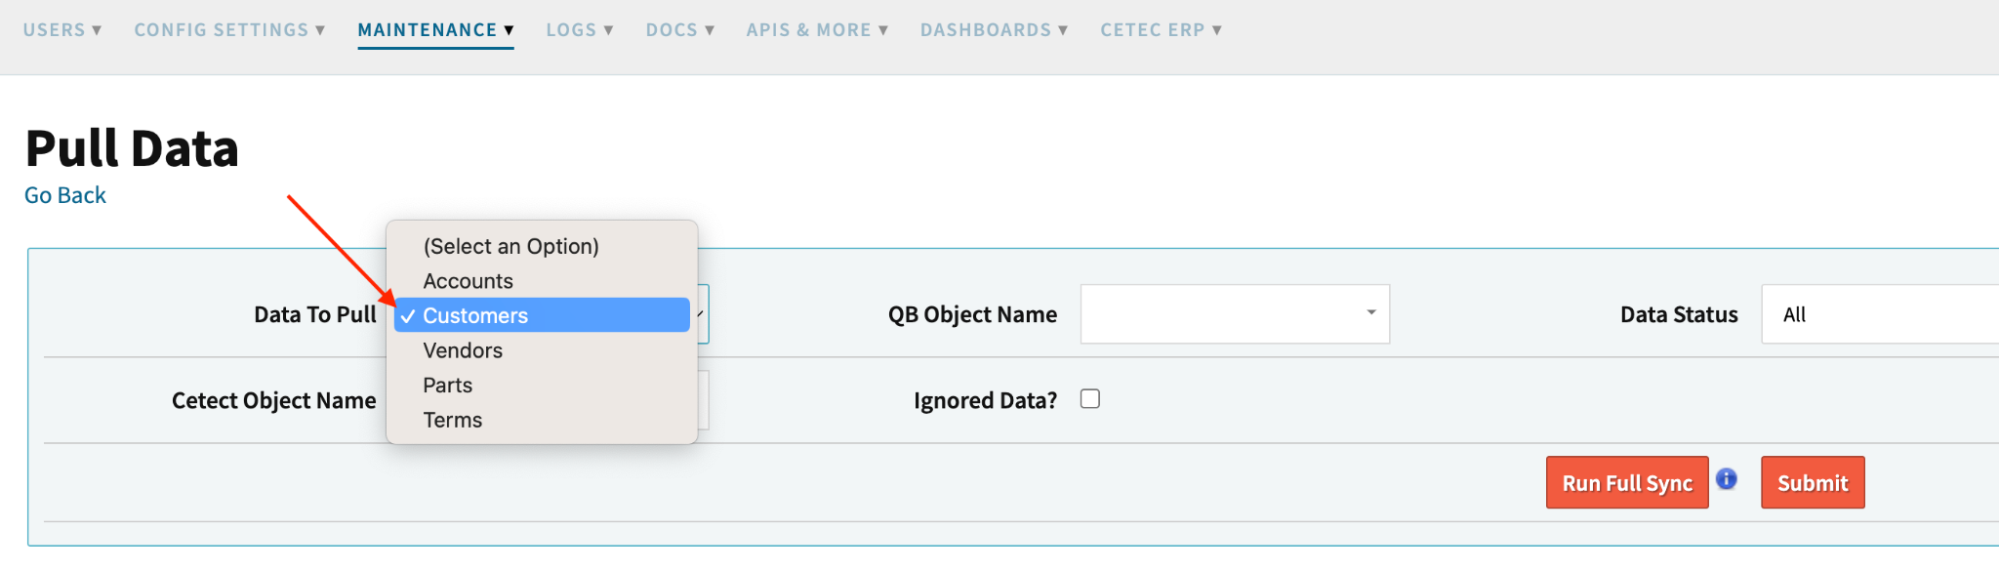
Then, click the “Run Full Sync” red button toward the far right of the screen. If successful, the resulting table will contain all existing records of that selected data type down from QBO into this mapping/admin screen inside Cetec ERP.
The far left column will contain all of the names of the records from QBO. The column to the right of that will contain the record in Cetec ERP that we attempted to “smart match” based on similarity of the name of the record.
If no matching Cetec ERP record is found, there will instead be a search field to lookup the matching record inside Cetec ERP
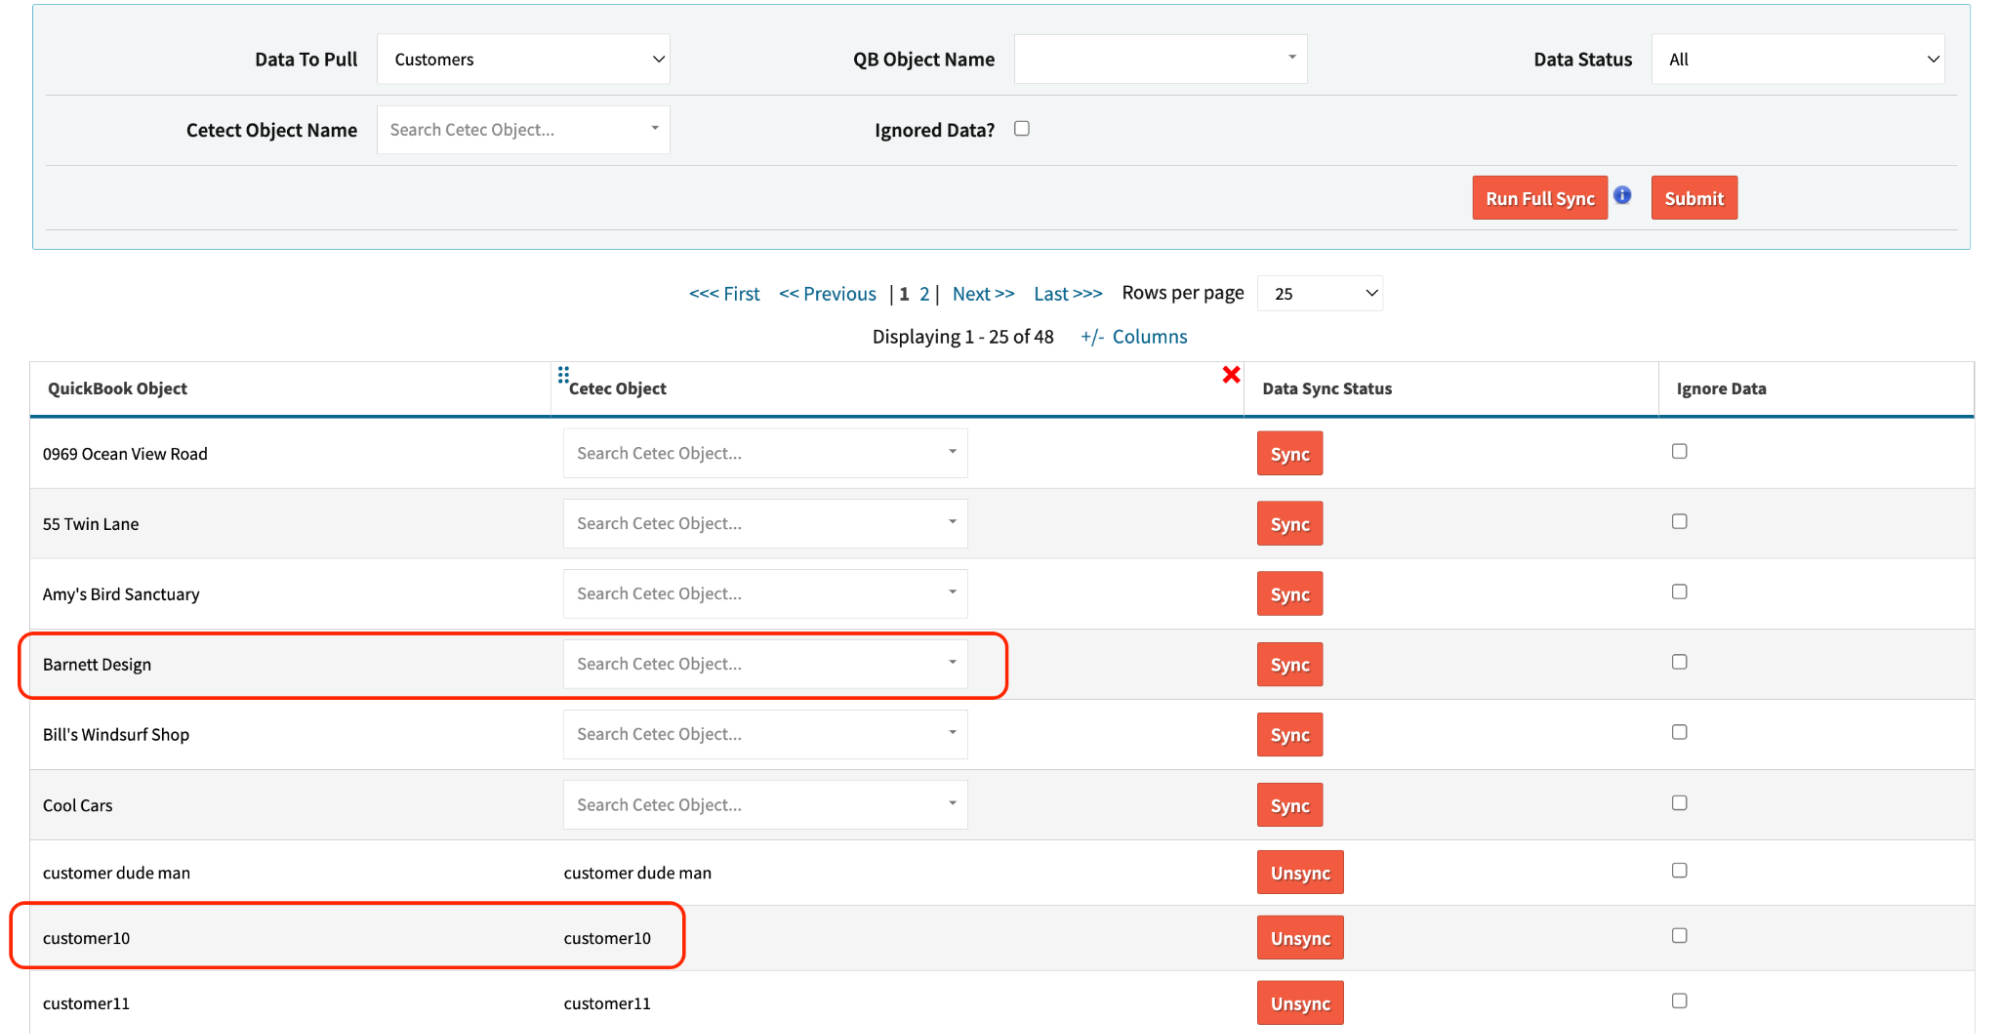
2. Sync The Records Inside Cetec ERP To The Records In QBO
For example, see Customers below. Type the customer name (from Cetec ERP) in the “Search” column, click the customer name via the dropdown, then click sync.

After clicking Sync, the unique customer record in Quickbooks will be tied to the unique customer record in Cetec ERP, and that customer will be removed from your list of customer records to sync.
You must manually click through every record you want to sync.
If there are records in QBO that you don’t want to sync to a corresponding record in Cetec ERP, you can click the “Ignore” checkbox without filling out the record.
If you add more data to QBO, you can always come back to this page and click “Run Full Sync” (and then manually find the record and click the sync button) to connect that data to Cetec ERP.
Of course, best practice would be to create the record inside Cetec ERP as your authoritative data source, and the customer will then be automatically created in QBO for you! That brings us to the next section of this document: How does the Cetec ERP » QBO integration work?
Notes
- IMPORTANT! The accounting period in QBO must be “open” to the current, real-time date, otherwise the integration cannot function. In other words, if Cetec ERP is attempting to push data “today” (real-time) into QBO, and the QBO accounting period isn’t open to today, then we cannot push data.
- IMPORTANT! The first time you push a piece of data to QBO, Cetec ERP saves that as a snapshot in time and stores that inside config value “quickbooks_object_go_live_date”. If you then attempt to update a transaction older than that date, the data will not push to QBO as a control measure to prevent duplicate transactions from happening during the go-live period. If you wish to override this control, the config value date/time can be updated by a Cetec ERP Support rep.
How Does The Integration Work?
The QBO integration is a real-time, one-directional integration, whereby data is “pushed” from Cetec ERP into QBO automatically with no manual intervention. Absolutely no activity inside QBO pushes data back into Cetec ERP.
There are seven business objects in Cetec ERP that may be set to push to QBO (upon create, edit/update, and delete), which you may turn on/off in the Quickbooks Settings page: Parts (items), Customers, Vendors, Purchase Orders (Vendor POs), A/R Invoices, A/P Invoices (termed “Vouchers” in Cetec ERP, “Bills” in QBO), and General Ledger entries.
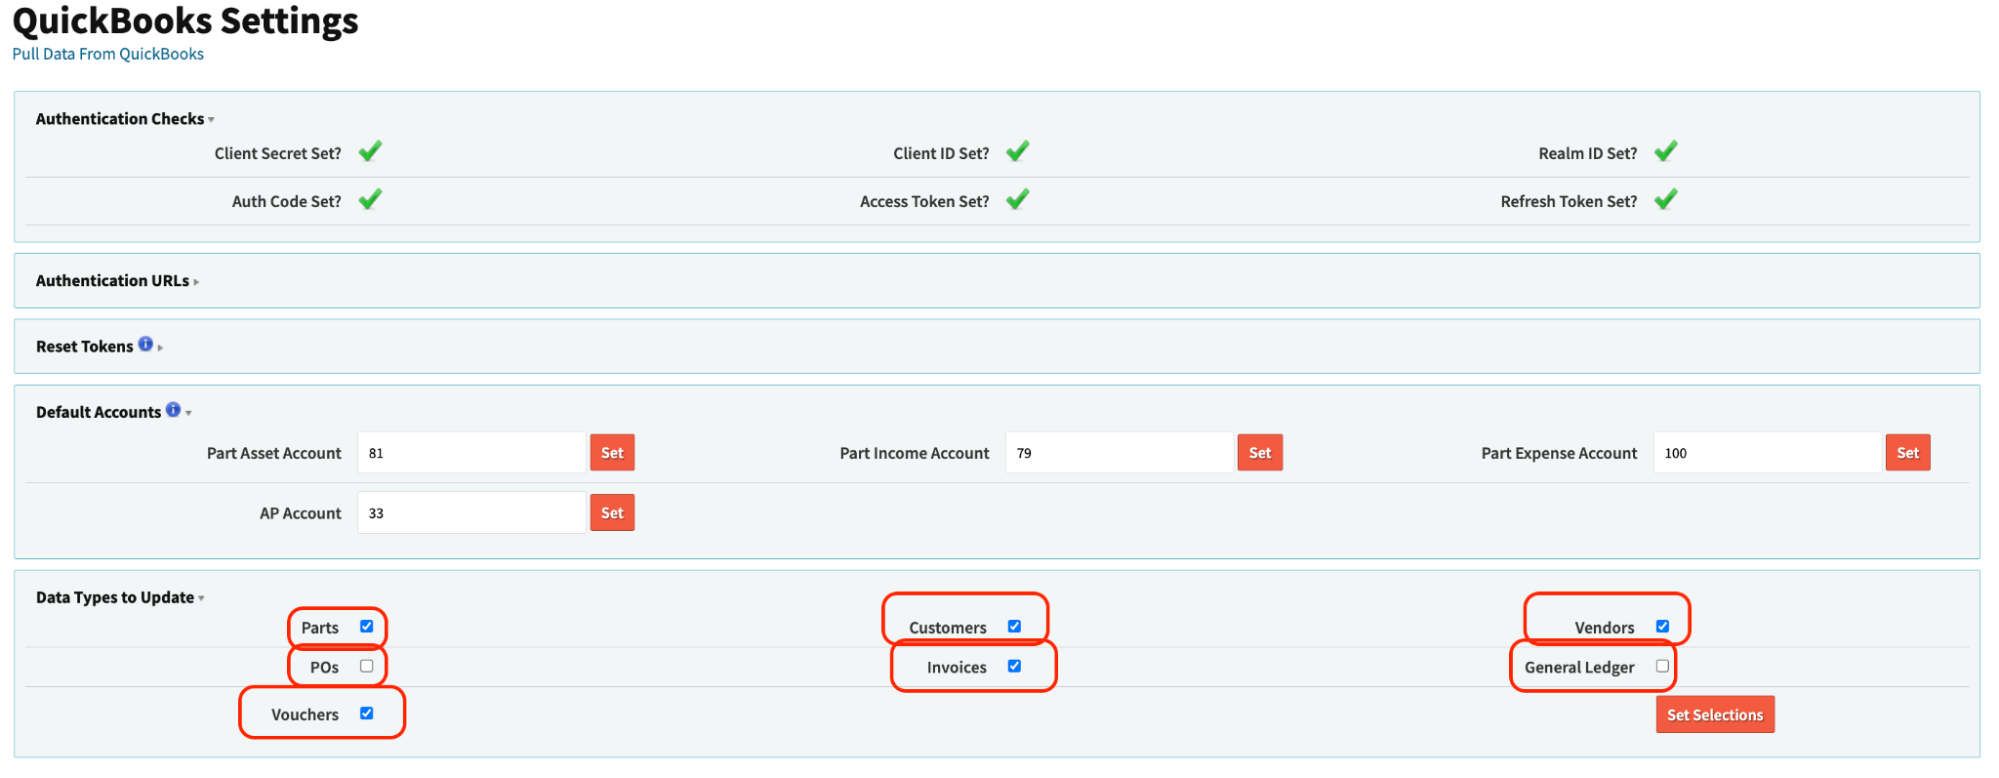
In order for Prcpart create/edit/update/delete to properly update items in Cetec ERP, the integration needs to know which Chart of Accounts in QBO to automatically set as item default accounts in QBO.
Specifically there are four default accounts that must be identified in QBO and entered into the QBO Settings page of Cetec ERP:
- Default Part Asset Account
- Default Part Income Account
- Default Part Expense Account
- Default Part A/P Account
It looks something like this:

Note: be sure that your chart of accounts were pulled from QBO and synced before attempting to map parts! (See setup steps in sections above.)
ALERT! These fields require the QBO Account “ID”, NOT the QBO account name or account number. The QBO Account “ID” is, candidly, very difficult to locate in the Quickbooks Online interface. To do this, go to the QBO chart of accounts, find the account, and click into it. Once in the account, the ID will only be found in the URL and is not visible anywhere on the screen. There are even cases where the URL itself re-directs, meaning you have to very quickly keyboard shortcut into/highlight the URL and copy it, then paste the URL into a new window in order to be able to isolate what the ID is. Whew! If/when in a pickle, contact Cetec ERP Support with the account name, and they can lookup the ID in the database.
(note: in v. 4.14, these fields will be searchable to match/select the QBO Account Name, assuming accounts have already been fully SYNCED between QBO and Cetec ERP, which should alleviate some of the difficulty of mapping outlined below)
NOTE! It is very important that you select the proper account in QBO to populate in these fields, or else the integration will not function and errors will occur. Please see below for an index of what “Account Types” and “Detail Types” (these are QBO terms) are required for an account to qualify as usable in these default account fields.
- Part Asset: The inventory asset account must have Account Type: ‘Other Current Asset’ and Detail Type: ‘Inventory’.
- Part Income: The income account must have Account Type: ‘Income’ and Detail Type: ‘Sales of Product Income’.
- Part Expense: The expense account must have Account Type: ‘Cost of Goods Sold’ and Detail Type: ‘Supplies and Materials’.
- A/P: The Accounts Payable account must have Account Type: ‘Accounts Payable’ and Detail Type: ‘Accounts Payable’.
Once the above setup and configuration steps have been completed, any new Prcpart created in Cetec ERP should have an identically named “item” created in Quickbooks with matching descriptions, default cost, default resale, and matching default G/L accounts to be used in GL mapping for that item in QBO (revenue, inventory, voucher/bill, COGS material).
NOTE! Even though the COGS account is termed “COGS Material” in Cetec ERP, this field COGS material is the only account used to map into the QBO Item “Expense” account. Cetec ERP accounts for COGS labor, COGS overhead, and COGS outsource are NOT USED in the QBO integration, because QBO only has one COGS account field that may be set to different values per item in QBO.
NOTE! Cetec ERP does push Prcpart inventory quantity on hand (QOH) data to the corresponding item in QBO. However, inventory data is authoritative in Cetec ERP only. It is not recommended to rely upon QBO inventory quantities, as QBO is not designed to be an inventory tool in the first place. To update inventory balances in the QBO balance sheet, it is recommended to regularly run the “List By Bin” real-time inventory total inside Cetec ERP as the authoritative inventory detail, and post that amount to the inventory balance sheet inside QBO on a monthly basis.
There are no prerequisites to push customers from Cetec ERP to QBO. Any customer update/create/edit/delete activity in Cetec ERP will mirror in QBO.
Once the above setup and configuration steps have been completed, any new customers created in Cetec ERP should have an identically named “customer” created in Quickbooks with matching customer ship-to and bill-to addresses and related customer meta-data. (Note: customer contacts in Cetec ERP are not pushed or supported in the QBO integration currently).
There are no prerequisites to push vendors from Cetec ERP to QBO. Any customer update/create/edit/delete activity in Cetec ERP will mirror in QBO.
Once the above setup and configuration steps have been completed, any new vendors created in Cetec ERP should have an identically named “vendor” created in Quickbooks with matching vendor addresses and related vendor meta-data. (Note: vendor contacts in Cetec ERP are not pushed or supported in the QBO integration currently).
Pre-requisites:
- Parts must be turned ON to integrate. When you click POs to integrate it will auto-check Parts for you.
- Vendors must be turned ON to integrate. When you click POs to integrate it will auto-check Vendors for you.
Once the above setup and configuration steps have been completed (specifically the A/P account in the above Part setup steps must be set!), any new vendor POs created in Cetec ERP should have an identically named “Purchase Order” created in Quickbooks with matching PO header and PO line information.
PO Line receipts in Cetec ERP will close out the PO in Cetec, but will not close out the PO in QBO automatically or update anything on the QBO side automatically.
It is recommended to proceed with the A/P Voucher/Invoice process in Cetec ERP to tie PO Line Receipts to the corresponding vendor invoice and achieve three-way matching inside Cetec ERP, not QBO. Additionally, vouchers inside Cetec ERP may be set to create/update/push mirrored “Bills” in QBO so that A/P payment may proceed in QBO instead of Cetec ERP.
A/P Invoices (termed “Vouchers” in Cetec, “Bills” in QBO)
Pre-requisites:
- Vendors must be turned ON to integrate. When you click Vouchers to integrate it will auto-check Vendors for you.
NOTE! Voucher Split GL account set in Cetec ERP cannot be set to a G/L account in QBO with an Account Type of “Accounts Payable” or errors will occur.
Once the above setup and configuration steps (including chart of accounts Sync) have been completed, any new Vouchers created in Cetec ERP should have an identically named “Bill” created in Quickbooks with matching vendor invoice header and G/L split/expense information. The Bill in QBO will be mapped to a G/L accrual or expense account according to whichever account is mapped on the “voucher split” within the Cetec ERP interface.
NOTE! A/P detail inside Cetec ERP may forever age/increase as unpaid. If this is bothersome, you may feel free to hide A/P menus from view in Cetec ERP config settings. Alternatively, A/P payment against vouchers in Cetec ERP may be manually entered/cleared or imported via .csv (A/P payment import not currently supported, coming soon in a future release to Cetec ERP.)
Pre-requisites:
- Parts must be turned ON to integrate. When you click Invoices to integrate it will auto-check Parts for you.
- Customers must be turned ON to integrate. When you click Invoices to integrate it will auto-check Customers for you.
Once the above setup and configuration steps (including chart of accounts Sync) have been completed, any new sales Invoices created in Cetec ERP should have an identically named “Invoice” created in Quickbooks with matching customer invoice header and invoice line information. The Invoice in QBO will be mapped to a G/L revenue account according to whichever revenue account is already set in QBO for invoices by default or item-specific QBO revenue mapping.
Invoices in QBO may proceed with customer payment/collections within QBO.
NOTE! A/R detail inside Cetec ERP may forever age/increase as unpaid. If this is bothersome, you may feel free to hide A/R menus from view in Cetec ERP config settings. Alternatively, A/R payment against invoices in Cetec ERP may be manually entered/cleared or imported via .csv (A/R payment import not currently supported, coming soon in a future release to Cetec ERP.)
Pre-requisites:
- Accounts must be turned ON to integrate. When you click General Ledger to integrate it will auto-check Vendors for you.
- Customers must be turned ON to integrate. When you click General Ledger to integrate it will auto-check Customers for you.
- Vendors must be turned ON to integrate. When you click General Ledger to integrate it will auto-check Vendors for you.
Once the above setup and configuration steps (including chart of accounts Sync) have been completed, any new G/L entries (i.e. debit/credit splits) created in Cetec ERP should have an identically named “Journal Entries” created in Quickbooks with matching accounts and dollar amounts and descriptions.
NOTE! The General Ledger integration option is only recommended to be turned ON if you are doing all A/P and A/R invoicing and payment activity solely within Cetec ERP. In other words, this G/L integration option is useful if you only are using QBO for financial statements/reports presentation purposes. Otherwise, we recommend leaving this option turned OFF.